Step #1 Creating Your Account
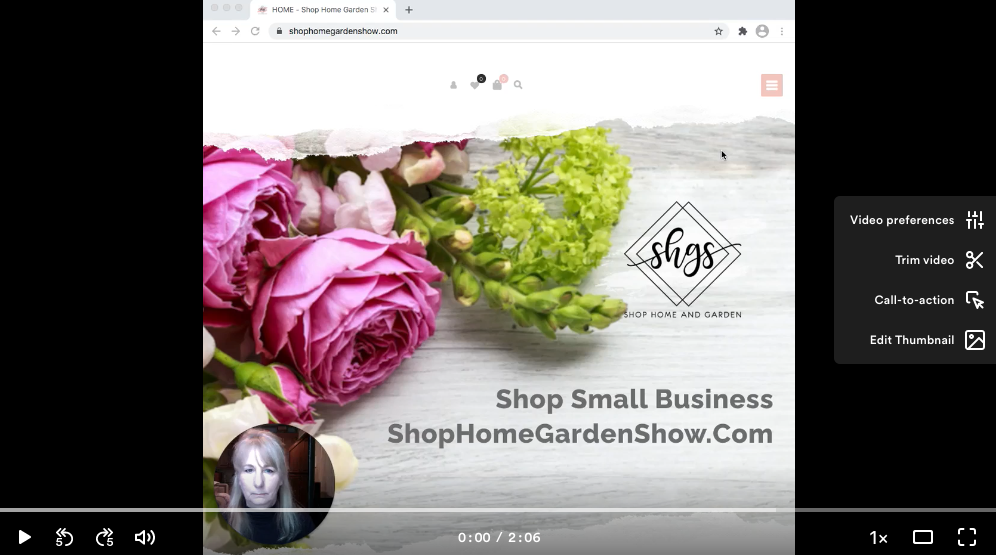
1-A). Go to website: ShopHomeGardenShow.com Click on “Create an Account”. If you do not see “Create an Account” widen your screen or click on Menu (shown as three lines on top of each other in pink box in the upper right hand corner) and then click on “Create an Account.”
Example 1-A

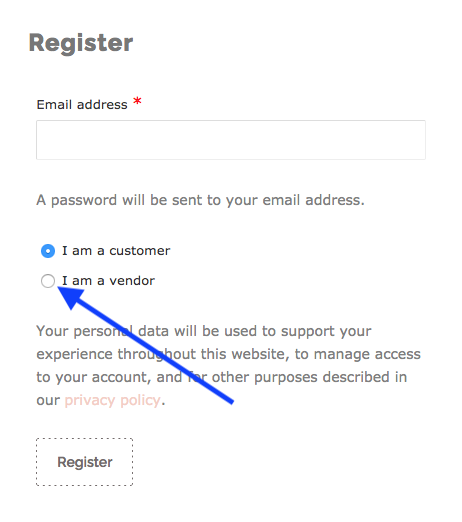
1-B). Register: Type in the email you want to use for your shop. Click “I am a vendor”. Click “Register”.
Example 1-B
1-C). You will receive an email for verification, hang on to it! In this email you will see your user name and a temporary password. Please make note of these as they will give you access to your shop. (You will be able to re-create a new password once you are logged in). There is also a link in this email, click on link, this step must happen to be able to login to your account. If you do not receive an email then chances are it got caught in your filter. Check your filter for the email.
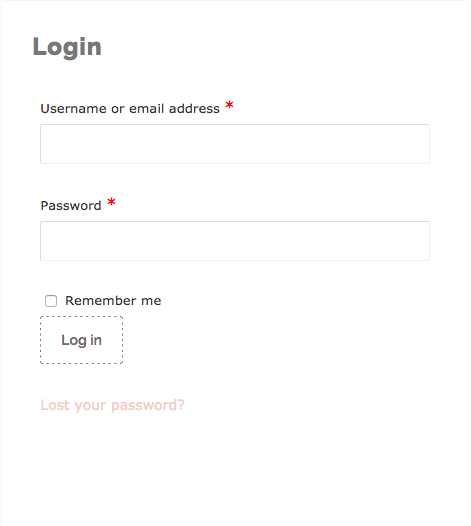
1-D). Login using the user and temporary password that was in your email verification.
Example 1-D:
1-E). Once you are logged in, click on “edit password” to create your own password. The button is to the right, see example 1-E.
Example 1-E


1-F). To create your shop, click on the pink button “Vendor Dashboard” then click on “Products” in the black column.
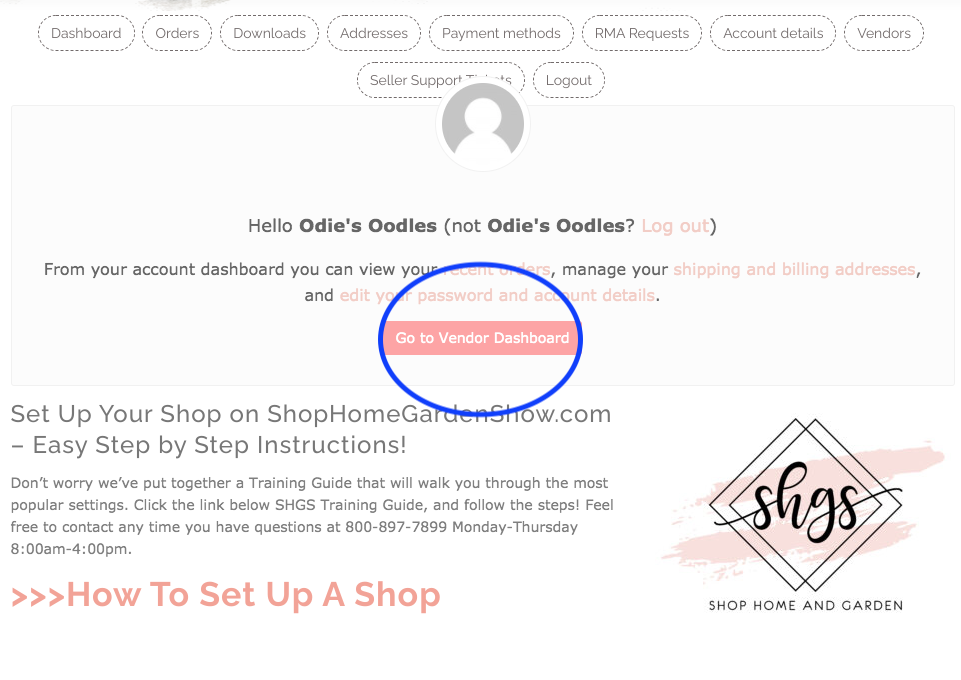
Example 1-F

1-G). Click on the pink box at the top, to the right, that says “Add new product”.

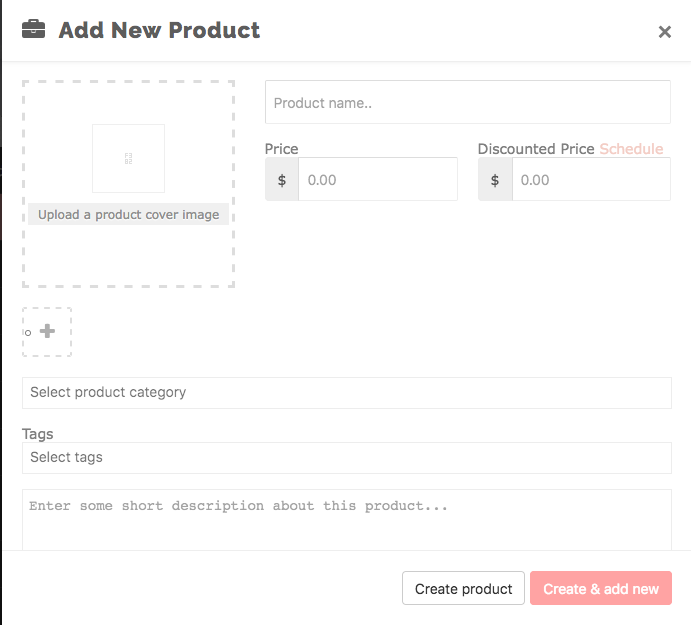
1-H). This box is where you are going to upload photos, describe your product and list the price. You will do this process for each product you want to sell.
The photos that you last upload will be the photos that will be on the top of your page. So save the best photos or the most popular products for last, so the homeowner will see them first. You can upload several photos for each product. This is where homeowners can shop what you have to offer so make sure you upload enough photos and descriptions that truly show your amazing product.
Example 1-H
Upload photo (square dimensions are best) by clicking on the words “upload a product cover image”. Then, in the upper left page, click “upload files”. Uploading the photo will take a minute. The photo should have a check mark on it, that means that photo has been selected. Then click “set feature image” at bottom of page. Look at the photo to make sure it isn’t distorted. If so, you will need to hover your cursor over the photo and a big red X will appear. Click on the Red X and this will delete the photo and you can re-upload a photo with different sizing that won’t be distorted.
Type in the name of the product.
Type in the price of this product, keeping in mind if you are offering free shipping. You have the option of offering a discount price for the holidays or anytime through out the year. This is an option. You can schedule the dates the discount is valid.
There is a + button below your photo where you can add more photos of the same product. We recommend uploading a minimum of 2 or more photos as it will give your customer a better idea of what the product really looks like, thus boosting consumer confidence in purchasing.
Tags. Type in a word or words that best describe your products. This will allow customers to find your product when they do a search. For instance if a customer types in “cabinets” in our web search, your product and shop will appear.
Write a short description about your product. This will show up next to your photo of the product. We recommend a short paragraph to give your customer a good idea of what your product has to offer.
Hit “Create Product” to finalize.
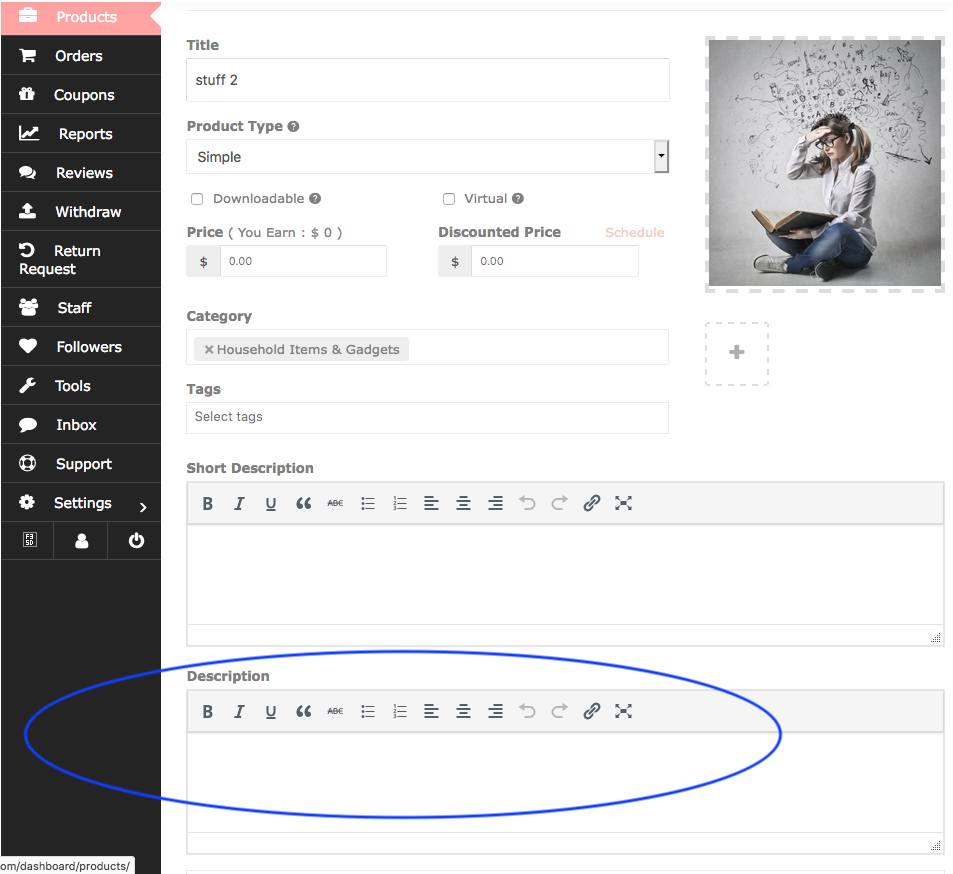
1-I). After you have hit “Create Product” a new window will appear with more options about this product. You now have an option to create a longer description! Describe in detail what your product and/or company has to offer. It’s your sales pitch.👍
Example 1-I

1-J). SKU. This is an option for the companies who keep track of products by SKU numbers.
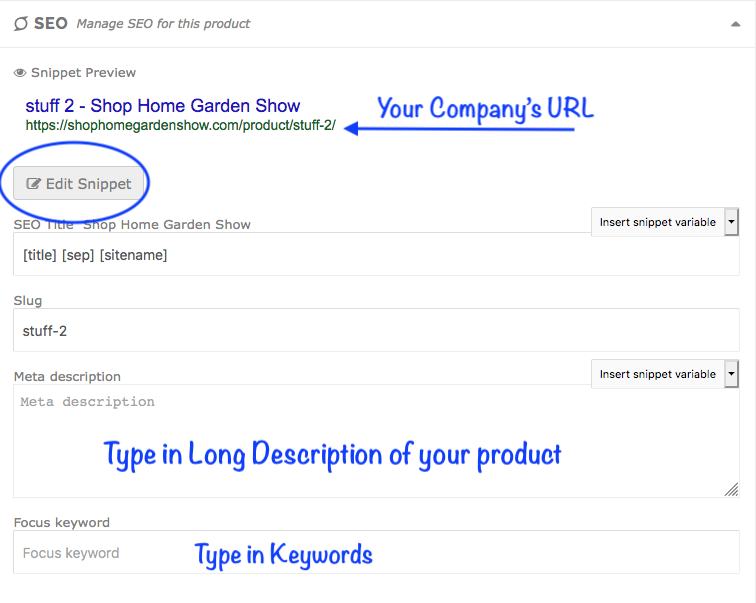
1-K). SEO. Your shop is not only on our website but is being presented on the internet on it’s own, with it’s own url! Click on “Edit Snippet” to type in a description of your shop in the Meta Description Box, this is what will be seen on the internet! You can also add a keyword that will help search engines find your shop on the worldwide web. You can use your shop’s url to promote your own shop.
Example 1-K
1-L). Shipping. Please make sure the box is checked for “this product requires shipping”. This will also include products that will be delivered. For the majority of vendors please click on “No Shipping Class”, Tax Status is “None” and Tax Class is “Standard”. California does not tax on shipping but some state do. Please refer to your carrier for more detail information on the different types of shipping options and requirements and what would be the most cost effective for your company. Further down this instruction sheet (2-M) will be another shipping section that offer more options.
Example 1-L

1-M). Tax is automatically figured out during checkout once the customer has entered in their shipping address. (Tax is based on the county the product is being shipped to.) Food Products in California are non-taxable so under “Tax Status” click on the drop down menu and click on “none” for food or non-taxable items. You are able to distinguish what each individual product’s tax status as you upload each product. Majority of products will be using the standard tax rate.
1-N). Purchase Note: This is a great opportunity to thank your new customer for their purchase! Need to Edit your product? Go to your dashboard and click on the product you want to edit. Click on edit. Make changes. Hit update.
Step #2 Uploading a Banner Photo and Profile Photo

2-A). Scroll further down the black column and click on “settings”. Click on “Store”. This is where you dress up your shop. Don’t skip this step as it has the biggest impact on what your store will look like!
Example 2-A

2-B). A must; Upload a banner photo which will represent your whole shop. This banner photo will be on the top of your page with your product photos down below. Photo size 625x300 is best, but a landscape or rectangle photo, (wider than tall) is the photo dimensions you will want to use.
2-C). Add a profile photo! Upload your best mug shot or if you prefer a small logo. This will give your shop a finished look…otherwise it will be an empty circle with a silouette and you don’t want that.
Example 2-B Example 2-C

2-D). Type in your shop or company name.
2-E). What category do you want your company name to listed under? Click to see drop down menu of category options.

2-F). How many products do you want to show per page?
2-G). No need to enter address, phone or email.
2-H). You may also list any Terms and Conditions.
2-I). You may shut down your shop when you are on vacation! Just type in your message and set dates.
2-J). Biography; this is your space to promote your company. Take advantage of this space!
2-K). Check the support button. Change the words on the support button to “Questions? Email Me!” or any title you want to give your contact button. This enables the customer to contact you directly and ask questions about your product or service. You will receive an email notifying you have a message. There will be a link in the email so you can retrieve the message. You can also check your vendor dashboard for messages.
2-L). Click on “Update Settings” at the bottom of page. VERY IMPORTANT TO SAVE YOUR WORK!

2-M). Shipping: You may ship anywhere in the U.S. but make sure you are aware of the different shipping laws for each state as some charge tax on shipping. California does not charge tax on shipping, but there is tax on handling, so be sure to only charge the exact amount that it will cost you to ship, as the difference will be taxed. Shipping costs can be complicated and so offering free shipping is the easiest and most attractive to your customer. If you do decide to charge for shipping be sure to contact your shipping company to be informed of all the options, regulations and the least expensive way for you to ship. This website allows each vendor to set up their own shipping methods.
Scroll further down the black column and click on “Shipping”. Hover over the pink “U.S.” and click on “edit”. Most vendors will only be shipping within California, so click on “Limit your zone location” and click on drop down menu and click on California.

You may offer the following shipping options:
Free Shipping: Click on the pink button, “Add shipping method”. Another drop menu will appear, click on Free Shipping, click on “Add Shipping Method” to confirm choice. Your Free Shipping Method is now added. Hover your cursor over the words “Free Shipping” and an edit button will appear, click on the edit button. You have the option of only offering free shipping if they spend a minimum amount. If you choose this, type in the amount. Then hit “Save Setting”. If you want all your orders to be free shipping, then just exit out. If you offered free shipping with a minimum order you can also offer flat shipping for when the customer does not meet the minimum order. However, if you are offering free shipping on all your orders you can not also add flat shipping.
Flat Rate Shipping: Click on the pink button, “Add shipping method”. The drop menu will appear, click on “Flat Rate Shipping” and then “Add Shipping Method” to confirm. Then hover your cursor over “Flat Shipping” and an edit button will appear. Then go to “edit” and enter in the cost.


If shipping in California, click on “none”. Make sure you hit “Save Setting”.

Local Pick Up: Click on the pink button, “Add shipping method”. The drop menu will appear, click on “Local Pick Up”. and then “Add Shipping Method” to confirm. Then hover your cursor over “Local Pick Up” and an edit button will appear. Then go to “edit” and make sure tax is marked “none”. make sure you hit “Save Setting”.
Free Delivery: Click on the pink button, “Add shipping method”. The drop down menu will appear, click on “Local Pick Up”, click on “Add Shipping Method” to confirm your choice. Hover your cursor over “Local Pick Up” and an edit button will appear. Then go to “edit” and delete the words “Local Pick Up” and type in “Free Delivery”. Then hit “Save Setting”.
-OR-
Delivery Charge: Click on the pink button, “Add shipping method”. The drop menu will appear, click on “Local Pick Up”, then click on “Add Shipping Method.” Then hover your cursor over “Local Pick Up” and an edit button will appear. Then go to “edit” and delete the words “Local Pick Up” and type in “Delivery Charge”. Enter in the Delivery Charge. Then hit “Save Setting”.
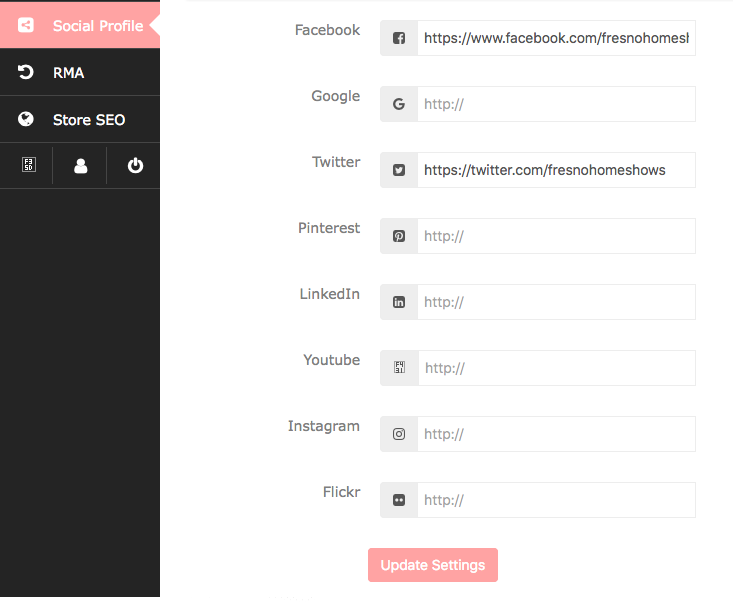
2-N). Social Profile: Add your Facebook, Twitter, Instagram accounts here. Let the customers know you have social media pages. For every social media page you add a social media icon will show up on your shop. This is a “clickable” link to your social media page and a great way to gain new followers. Click on “Social Profile” in black column then add url’s to the specific social medias.
2-O). RMA (Return Merchandise Authorization): This is where you can state your warranty and/or return policy. Click on “RMA” in the black column.
Click on the drop down menu for “Type”. Choose your warranty type. If you choose “No Warranty” go to the next step. If you choose to have a warranty, click on the options whether it is “Limited” or “Lifetime”. If you choose Limited, then choose the duration. If you choose to have “Warranty as Add On” then type in the cost and the duration.
Refund Reasons: Click on the reason(s) that you will allow a refund, you can have more than one. If there is a reason that is not listed, let us know and we will add to the list!
RMA Policy: State the conditions on when you will accept a return. For example: “May return item within 30 days of purchase, provided the item has not been used and is original new condition”
Click on “Save Changes.”
Step #3 Setting up a Stripe Account
3-A). A Stripe Account is how you receive your payment. Click on “Payment” in the black column. We are accepting Visa, MasterCard, Discover, and American Express from your customers. To receive your payment when you make a sale, create a Stripe account. Stripe is a complete payment platform that will transfer funds directly to you.
Millions of companies from start-ups to Fortune 500s use Stripe! Stripe offers Level 1 certification, ensuring that your company and your customer's data is secure.
Click on blue button “Connect”. Fill out form to connect your shop to your bank account so you will automatically and securely receive payment. Payments are received automatically 1 week after the sale is made. This should give you time to place order and ship out. Click on Update Settings.
Example 3-A

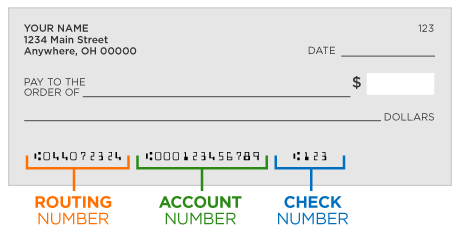
How to find your account and routing numbers:
3-B). Click on “Social Profile” in Black column. This last item is optional, but it only takes a minute and will help promote your company. Place your social media url’s (Facebook, Instagram, Twitter, etc.) in the appropriate boxes. The icons will appear on your shop page so consumers know they can find you on social media. The icons also can be clicked on and take your customer right to your social media page so they can start following you! Click on “Update Settings” to finalize.
Example 3-B
That’s it! Congratulation, you’ve created your shop! 😀 👏👌
Please preview your shop so you know you are happy with the way it looks. Go to the top of the page and click on “home”. Once on the home page click on the category/photo that you have your store listed under. Find your shop and click on it. If you are not happy with the look of the photos or your descriptions go back to the vendor page by clicking on the “Create an Account/Login”, then click on “Vendor Dashboard” then “Product”. You will see a list of the products you have uploaded, click “edit” to make the changes you want.
We will also preview your shop and contact you with some suggestions if needed. Once we have loaded up enough shops we will start promoting the ShopHomeGardenShow.com Website and choose shops that looks awesome! Then the Central Valley can start shopping, supporting small and local companies and your company can get more visibility and more sales throughout the year!
Questions? Feel free to contact us at julieg@fresnoshows.com. We will be happy to walk you through this process and answer any of your questions!


